-
My First Transoceanic Trip

Okay.
When I was switching airlines, I was very very careful to say that my motivation for switching was the international flight BENEFITS. NOT the international flying.
Why? I had no idea if I’d like working long international trips at all!
I’ve always said that my favorite layovers are “any that are over 20 hours.” And my favorite types of trips at my previous airilnes were transcons and Hawaiis. (Transcon means “transcontinental,” or flying from one side of the country to the other). I preferred transcons and Hawaiis at my former airline because these trips typically meant one long flight, followed by 24 hours of hanging out in a cool place, followed by one long flight back home. Transcons are a beautiful work-hard/play-hard balance!
So, while I knew that I preferred longer flights and longer layovers, I wasn’t sure if I’d like the REALLY long flights like were now available at my new airline.
Well…two weeks ago I tried out my very first transoceanic trip. Here’s how it went:
It started with the bane of my existence: Airport standby. (This is when you sit around at the airport ready to fly out at a moment’s notice, in case another flight attendant can’t make their flight). I was sitting in the employee lounge, generally irritated (because I hate airport standby), when I decided to click on the app my airline uses for assigning trips. It’s generally good practice to look at this app a lot, to see if there are any good trips to swap into. Anyway, when I clicked on the app, I saw that there was a London Heathrow trip that was leaving in <2 hours. Do you know what that means??? That means it’s going to someone on airport standby, because they have to give people who aren’t at the airport 2 hours to get to the airport. OMG. OMG. OMG.
My airline has a “first in first out” rule when it comes to airport standby. What that means is that if a trip becomes available, it goes to the first person who got to the airport for airport standby. My airline also doesn’t really stack the airport with all that many standbys, so when I saw the trip, I knew it should either go to me or that it was possible that it would go to a standby who had gotten there an hour-or-so before me. As I was contemplating this, I clicked on the trip in the app…and saw…MY NAME!
I stared at my phone in disbelief. I was going to London??? Wha???
I called Crew Scheduling to confirm that I’d be going to London, and then spent the next hour trying to figure out how to do a good job. The problem? My new airline does position sign-ups by seniority. So…it’s hard for a newbie to prepare when I won’t know until I meet my crew what position I’ll be working. I did my best, reviewing galleys and service standards and other documents. I was most scared of something called the “Galley Position” whose job is essentially working as the kitchen organizer/prepper/master. In other words, their job is to make sure the guests get amazing quick service by making sure the food is cooked, plated, and lovely. In order to do well at the Galley Position, you have to know the order of service, the organization of the galley, and you have to stay super organized with counting meals and keeping everything in order. In other words: Things it’s really hard to do when you’ve never even been in the galley of a wide body aircraft or seen the service in real life! Because the Galley Position is so much work, it often goes to the most junior crewmember, because no one wants to do it. In other words: ME.
So…I was scared. To get ready, I reviewed all I could about the service and the galley.
I later realized that I had reviewed the WRONG service and galley. I thought the Galley Position is in the main cabin, when it’s in first class! My preparation did NOTHING to prepare me for the Galley Position!
Thankfully, when I got to the briefing room and people were signing up for positions, a crewmember asked me if I’d ever worked galley. “I’ve never worked a wide body!” I exclaimed. He volunteered to take the Galley Position to protect me. The the next most junior crewmember volunteered to do it on the way back.
I was SAFE! Safe from Galley.
Working the flight was still a challenge, since everything was new to me, but it was also fun! When I got on, I had a hard time finding my safety equipment, and often had to clarify my role or where to find things. But, I was communicative with my crew when I needed direction or help, and they were kind and communicative back. I like doing first class service domestically, so it was no surprise that I enjoyed working the extra fancy first class on a transoceanic flight. I always show my genuine personality to passengers and am playful with them, so my sweet first class passengers all knew it was my first time working a wide body, and were understanding and kind when I made mistakes or had to ask my crew about how things worked.
I usually don’t like working red eye flights, because the passengers fall asleep, and then it can get boring. But I didn’t get bored on the transoceanic flight because there was more to do than on a domestic flight. I like staying busy, so this worked well for me. This is how it goes: Drink and meal services in all cabins, including clean up. Then half the crew goes to crew rest, and the other half stays up to take care of passenger needs (but most passengers go to sleep during this time). During this time, I was able to keep busy by doing water and juice walks, check on passenger needs in first class, checking on lavatory supplies, and chatting with crew. After the first crew finishes crew rest, there might be another snack or meal service, or might not be, depending on the length of the flight. Then the other half of the crew goes to crew rest. When they get up from crew rest, there’s a final meal and drink service, and then you land!
Crew rest was interesting! I got to go to a hidden little room under the main cabin where I climbed into my little bunk. I had worried I’d feel a bit trapped in the bunk, but I didn’t. The bunk has a curtain for privacy, and a reading light. I took out my contact lenses, and tried to sleep, but I couldn’t sleep because I was so excited to be on my first transoceanic flight! It was still nice to have a little privacy and a little time to just be!
After carefully making it clear that I’m at the new airline for the international flight benefits, NOT the international flying. I’m here to say, “I LOVE long international flights!” It’s so fun keeping busy. I really really enjoyed it and hope it’s not too long before I get another transoceanic flight!
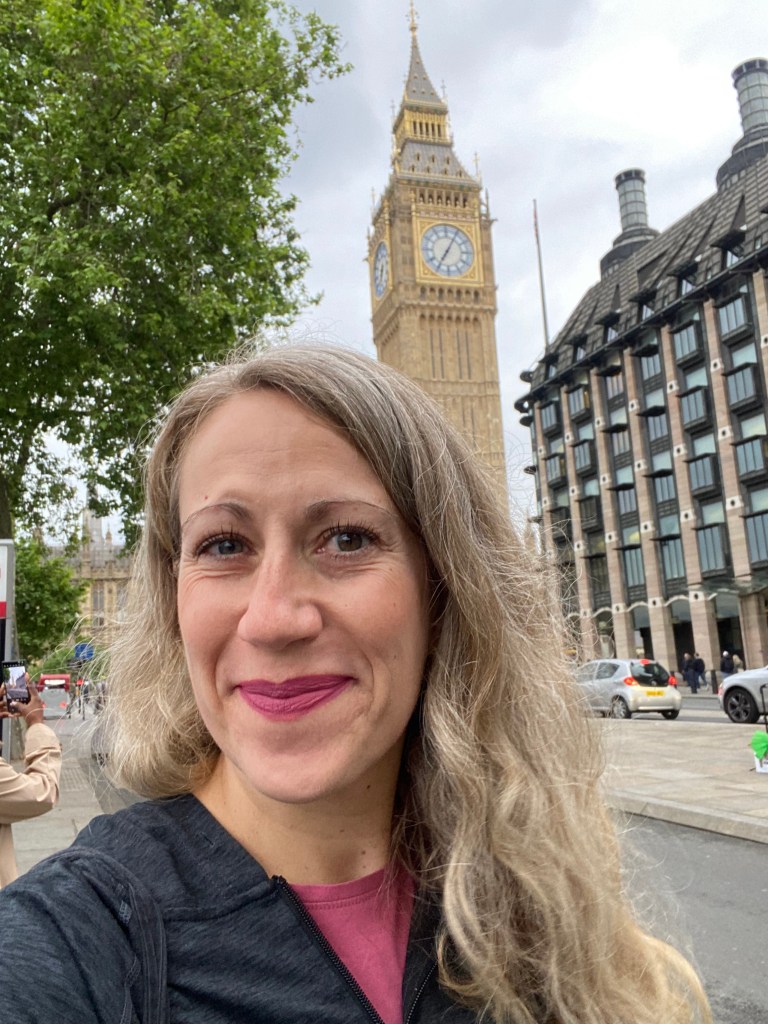
London is one of my favorite cities, and I enjoyed wandering the city as always.
-
What I LOVE about AirBnBs

I wrote awhile back about a truly terrible AirBnB experience in Osaka Japan. While I was in the midst of the chaos of this experience, I kept thinking, “I know I’ll use AirBnB again…” AirBnB has it’s fair share of flaws, and I do plan to write about the things that I hate about AirBnB. But I’m of the opinion that there’s a whole lot more to love about AirBnBs than to hate. Here are some of the things that I love about AirBnBs:
- Money saving. I don’t exclusively stay at AirBnBs. I always search for both hotels and AirBnBs in any area that I’m traveling to, and more often than not, it’s cheaper to stay at an AirBnB than at a hotel.
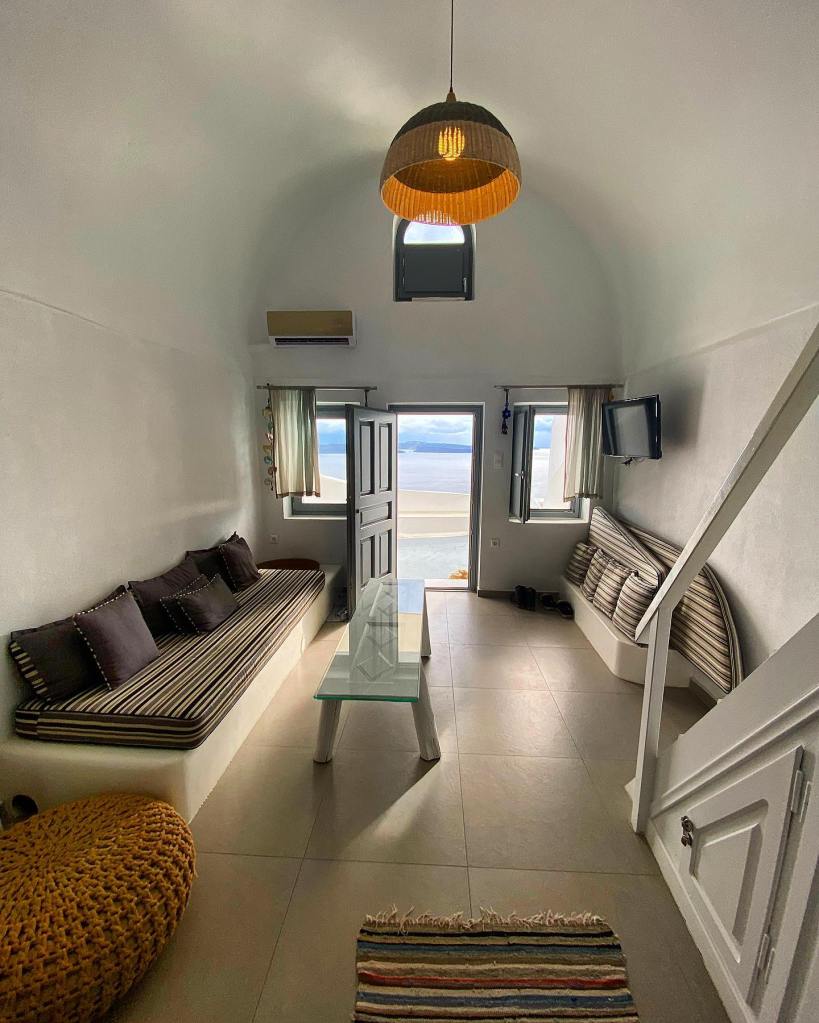
- Unique spaces. Through AirBnB I’ve stayed in a traditional cave home in Oia, stayed in a beautiful off-grid space in Mallorca, and stayed in a traditional Japanese home (okay, that one smelled musty, but it WAS an interesting experience rolling out our futon mats and moving the bamboo screens around).
- Multi-room spaces. Guess what? I don’t need to sleep as much as my kid does! I’ve had so many unpleasant experiences in hotels reading books on the toilet so that I could keep the room completely dark so my kid could sleep. With AirBnBs, it’s more likely that my kid can have a separate room and therefore my husband and I can move around freely after she goes to sleep.
- Laundry. I see you sillies with your huge suitcases for a one week trip. I prefer to travel with a carry-on sized suitcase if possible. With a kid, this gets a bit difficult because she spills and trips and gets her clothes dirty. But many AirBnBs have laundry! It’s awesome being able to just carry a backpack worth of clothes for a multi-week trip because we’ll have laundry available along the way.
- Getting into the goooood neighborhoods. Whenever I’m heading to a new city, I research where to stay in that city. Often time the recommended neighborhoods are super expensive for hotels, but reasonable for AirBnBs.
- Kitchen. One of the best ways to save money while traveling is to make sure that not all of your meals come from restaurants. With an AirBnB, we can make our own food and save a lot of money!
- Local help. Many AirBnB hosts will provide special information about where to go, where to eat, and what to see. They can often help set up drivers or tours if needed. In 2021, we visited a climbing area in Kalymnos, Greece in the off season. We quickly realized that because it was the off season, the restaurants in the area were all closed. No major worries, because we could cook in our AirBnB since we had a kitchen, but we did ask the host if she knew of any restaurants that would be open. She did not. Guess what she did? She asked the owners of a local restaurant if they’d open for us. They agreed! We had a private dinner in a local Greek restaurant, which simply would not have been possible without the help of our local AirBnB host.
- Little Extras. AirBnBs are more like to have special surprises that hotels don’t have. In Kauai over Christmas, our AirBnB host provided surfboards, boogie boards, sand toys, and snorkels. We’ve stayed at AirBnBs that provided transportation. I’ve been given little gifts like cookies, flowers, and other local gifts.
If you’ve never tried an AirBnB before, I do think it’s worth a try; I personally would typically prefer an AirBnB over a hotel most of the time. Don’t worry though, there’s a lot of stuff that drives me CRAZY with AirBnBs…but we’ll leave that for another post!
-
Monkeyshine Season: The Best time of the Year!

Tacoma is often a very overlooked city. I’d say she’s kind of the Jan Brady of Washington State: Not as cool as big sister Seattle, and not as cute as little sister Olympia. I’ve lived in Tacoma for over a decade, and the city really has grown on me! We’re now entering the most special time of year to be a Tacoman: Monkeyshine season!
What is Monkeyshine season? It’s the time of year when Tacoma becomes the land of treasure hunting!
Over two decades ago, some glass artists got together and decided to create glass art to hide around the city for hunters to find and keep. This all occurred around Lunar New Year, and that particular year was the year of the monkey, thus monkeyshines were born! The artists have kept the tradition going for over two decades, and now community members have joined in by creating their own treasures to be found!
The official monkeyshines are of two types made by local glassmakers:
1). Orbs. These are the most sought after of the monkeyshines. They are hollow glass bulbs that are typically topped with medallion with a seal showing the animal of the year on it.
2). Medallions. These are glass medallions that have a seal showing the animal of the year.

These days, community members have joined in and leave “rogue” monkeyshines around town. Rogues can be anything. I’ve found keychains, marbles, toys, popsicle stick creations, stickers, coins, bookmarks, and red envelopes.
So basically, around the time of Lunar New Year, Tacomans start combing the streets looking for treasures to bring home.
Here are some important tips to help you in your search:
1). Monkeyshines are always found in public spaces. If you see it in someone’s yard, it’s NOT a monkeyshine for you to take. I’ve found monkeyshines in parks, at libraries, outside businesses, and near schools.
2). There is one big “drop” day when most glass monkeyshines are put out. I have ALWAYS found this to be on Lunar New Year. I’ve heard the big drop CAN be on other days, but I’ve never actually experienced it being on any day other than Lunar New Year.
3). It is 100% worth looking for monkeyshines both before and after Lunar New Year. I have found two orbs total in my life. One was found several days before Lunar New Year, the other several days after. Some Tacomans claim that they all go out on the same day. They do not. MOST, but not all, go out on the same big drop day.
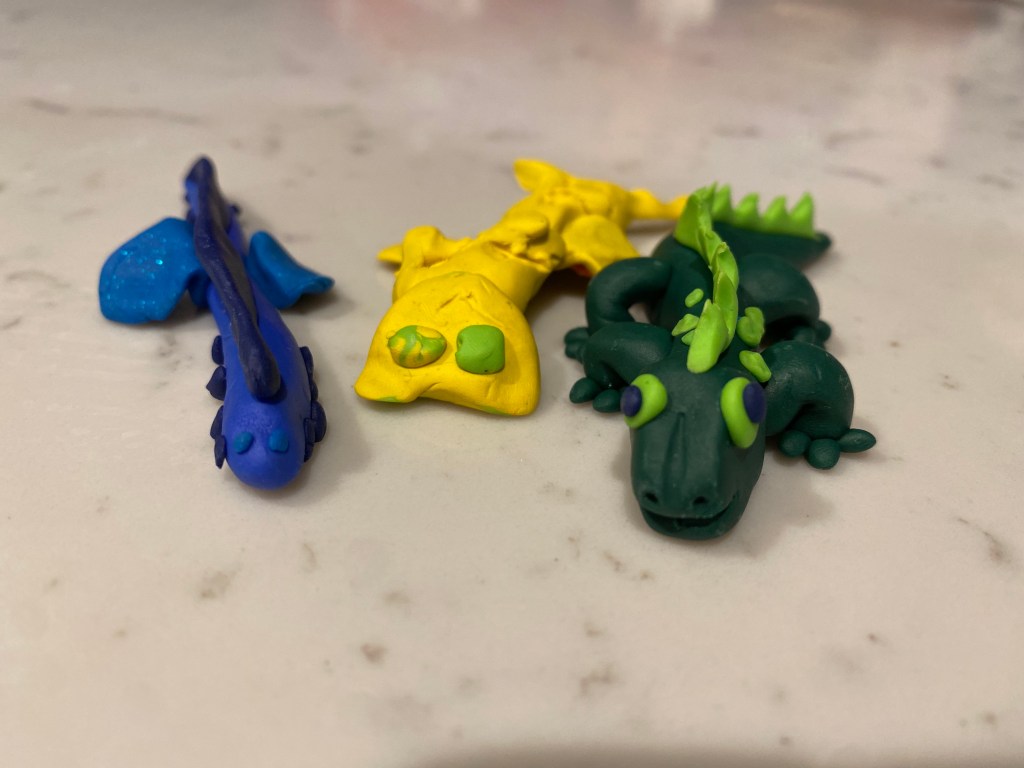
4). Getting in on the fun by creating and hiding your own rogues makes Monkeyshine season so much more magical! We’ve started a tradition of making polymer clay creations that we bake to harden and then hide around our neighborhood, and it’s so very fun!
5). The best time to hunt is in the dark. This one is very much just my opinion, but I’ve had the best luck finding monkeyshines in the dark. Hiders like to get out when people won’t see them…in the dark, so looking in the dark yields the best results in my experience.
Etiquette Rules:
1). Do not chase monkeyshine hiders. Ms Monkey (the queen of monkeyshines) has stated that some of her helpers have gotten scared because of hunters following them. If you see someone out and about and suspect they’re out hiding monkeyshines, just leave them be. Once they’re gone, feel free to look where you saw them go, but do not follow them.
2). Only take one glass per year. This is to make sure that more people get to enjoy the monkeyshine fun! Some people say it should be one glass total for life. As a hard working hunter, I disagree! Every year I pour hours and hours into finding monkeyshines, often out searching in snow and cold, and always searching many days per week, and often several times per day. Despite all the effort I’ve put in, I have only one orb from my years and years of hunting, and if I find another, I’ll keep it. (I did find two orbs in the same year, so had to return one to the wild, because I am in agreement that it should be one glass per year).
3). Rogues are fair game. I choose to implement a one-rogue-per-day rule, to give others a chance to find some, but if others choose to take multiple rogues, I won’t argue against it. We do trade-up in our family though! If L finds a better rogue, we let her take the “better” one, and then re-hide the old one.
So, friends, get out and get hunting! It’s the best time of year to be a Tacoman! I’ve been home for the past 3 days, and found rogues every single one of them! The time to hunt has begun!
-
Things are Getting Weird…
Okay.
Hmm.
I wasn’t sure if I was going to write about this, but…things are getting weird, and a little writing therapy sounds comforting right now.
In April 2023, I spent $47 to fly from Tokyo to the US, and it was just so incredible. Can you imagine the high of getting to fly internationally for that cheap? I was able to do that because I’m a flight attendant. My family flew separately from me because they do have the same flight benefits on other carriers as I do as a flight attendant.
I returned home from that trip and told Saign that I kind of wanted to try again for another airline…one in which my family would also get to fly from Tokyo to the US for just the $47 taxes.
I thought Saign would say “absolutely not,” because training takes me away from the family, and because I wouldn’t be guaranteed a base in SEA, and because losing seniority will hurt, etc, etc, etc.
To my surprise, Saign didn’t tell me I was crazy! He said, “Do it!” He pointed out that the whole point of this job are the flight benefits, so I might as well get the best flight benefits that I can.
In October, I got a conditional job offer with a big airline.
There are many reasons I think this is the right choice. Here are a few: 1) International flight benefits for my family (as discussed above). 2) I truly believe that I will be working for the best carrier in the US; the airline that I am switching to offers a great product, and since I like to do things well, it will feel really really good to me to be able to feel that I’m offering the very best to my passengers. 3) Variety. One of my favorite parts of this job is that it changes every day. New passengers. New destinations. New crews. New experiences. With a bigger airline, I’ll get more variety, and that is very appealing to me. 4) I don’t have much faith that my current airline will be growing and thriving they way that I think it needs to to stay alive and relevant in the years to come.
Oh wait. Yesterday many of these factors got ROCKED. Yesterday, my airline announced that they are acquiring another airline. An airline that flies to Asia. An airline that flies widebodies.
OH.
Maybe my airline is going in a direction I like????
I’m a little…rocked…at this point. I still think my new airline is the right choice.
But I’m heartbroken about leaving my family for 7 weeks to go to traning.
I’m very legitimately worried that I won’t be based in SEA at first, which means more time away from my family as I would commute by airplane to work.
And now I’m wondering if my airline might be changing and growing in such a way that it might become the airline that I’d prefer to be with in 10 years.
Maybe?
Maybe not.
At this point, I’m fairly certain I am switching airlines, but…things are weird right now.
NOTE: Airlines have very strict social media policies, which is why I have never mentioned the name of my current nor future airline online, and I never will!
-
Disney on a Budget…Tokyo Disney

Fact: I love Disneyland! When I lived in Southern California, I had an annual pass to Disney, because I love it that much (it’s the most magical place on earth!)
Fact: The prices at Disney are really ridiculously high these days! I used to hold an annual pass that allowed me to go every day except spring break and on Saturdays during the school year…and it was around $130. Now, tickets for just one day in the park are often $120. We are a family of three…Disney could get expensive really really quickly!
Want to know how to save on Disney tickets? GO TO TOKYO! Seriously. Beautiful, clean, fun parks, and they’re around $60 a day! That’s half off the price of the US parks. (The park prices do vary, so it’s tough to be too specific about prices!) Tokyo has two Disney parks: Tokyo Disney, and Tokyo Disney Sea. Since the tickets are half the price of the US parks, I thought it made sense to spend a day in each!
We brought L to Tokyo Disney and Tokyo Disney Sea in April 2023. It was magical! Afterwards I asked her, “Was it everything you hoped and dreamed?” She replied, “It was better!” This may not seem to be that big of a deal, but L is pretty dang hard to impress. I don’t think she’s ever said that something was better than she imagined before!

I loved Tokyo Disney too! Here are a few tips to help you if you choose to go:
- Buy tickets in advance. At Disney Tokyo they do not sell tickets at the gate. Tickets must be purchased ahead of time. They also cap how many tickets they’ll sell, so buying in advance ensures you’ll get in on the date you want.
- If you’re American, Klook is a reputable ticket dealer. The Tokyo Disney website does not like American credit cards. I tried and couldn’t get it to work. Finally, I followed what Reddit told me to do: I bought through Klook. It worked just fine! If you can’t get your card to work on the Tokyo Disney website, go with Klook.
- Get there before they say they open. We got to the parks about an hour in advance because I read that they typically open 30-45 minutes before their published opening time, and this turned out to be true! We got through the gates well before the published opening time!
- Eat the popcorn. The Tokyo Disney parks are known for having special flavored popcorn. Unique flavors like curry, chocolate, etc. It is fresh, warm, and delicious. Chocolate was my favorite, but chocolate everything is my favorite, so that’s not too surprising!
- To save $$, avoid Disney hotels. We stayed at an AirBnB in Shinjuku Tokyo for $50/night. It was really not that big of a deal to take the train into the Disney parks.
- TRY THE LITTLE GREEN DUMPLINGS. I thought I should try these because they’re adorable, but because they’re called dumplings, I expected them to be savory. To my delight, they’re actually cream-filled mochi! They come in a set of three: vanilla, strawberry, and chocolate.
- Leave walking time for Tokyo Disney Sea if you take the train. We did our first day at Tokyo Disney, and getting there from the train was an easy little walk. I was surprised when we had to walk and walk and walk and walk to get to the Tokyo Disney Sea park. It’s much farther from the train stop!

Here are some unique things about the Tokyo Disney parks:
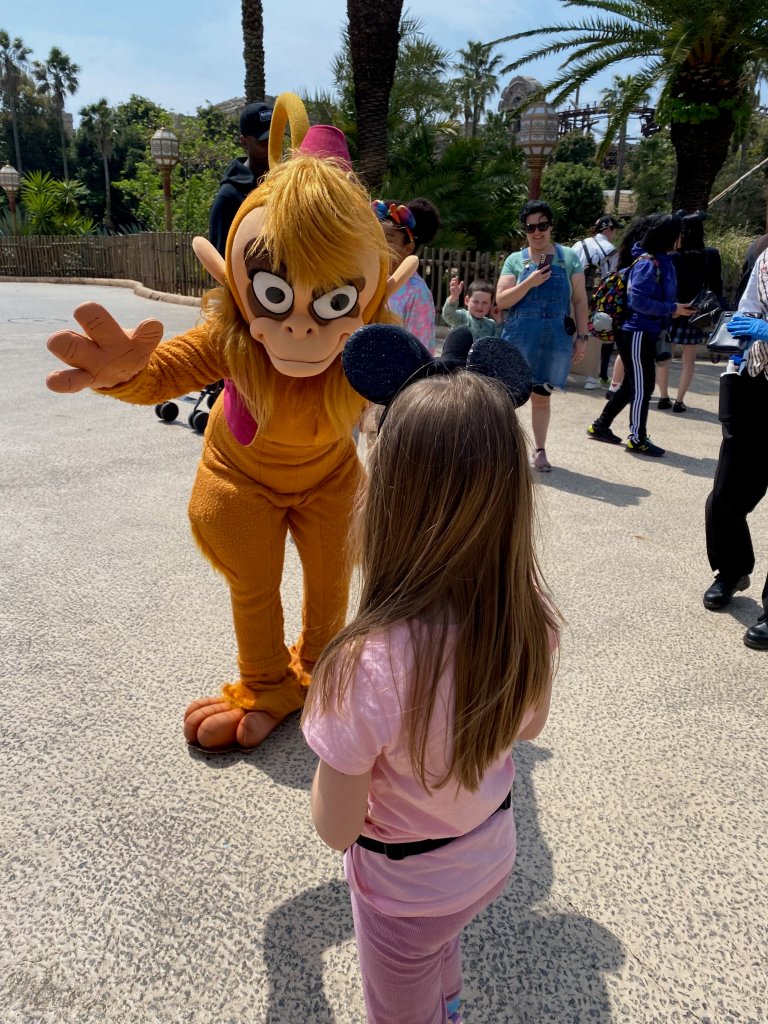
- Duffy. Yeah. So…he’s a teddy bear that is beloved in Japan??? As far as I know, he’s not featured in any films, but I guess he’s just rumored to be Mickey’s friend, and you’ll see him everywhere in the Tokyo parks. They have lots of Duffy merchandise, have Duffy meet-n-greets, and (most shocking to me) there are a LOT of grown adults walking around cuddling stuffed Duffy bears and taking pictures with their stuffed bears everywhere they go.
- Food! I wrote about my two favorites above, but there are several unique cute food options at the Japanese parks.
- Non-Disney characters. Tokyo Disney and Tokyo Disney Sea are the only Disney parks that are not owned by Disney. Therefore, they have some of their own characters that they use. This was most prominent at Tokyo Disney Sea, where many of the rides were themed around non-Disney characters. L’s favorite was called “Sindbad’s Story Book Voyage.” It featured a boy name Sindbad, and you follow his story on a boat ride through various rooms (It’s a Small World style).
- Unique lands at Tokyo Disney Sea. Tokyo Disney Sea has an incredible huge castle for Ariel called the “Mermaid’s Lagoon.” It’s huge! So huge that several rides fit inside it so that it’s a great place to visit if it rains. There’s also an “Arabian Coast” area, themed after Aladdin. The coolest thing about the Arabian Coast area is that instead of piping a sugary sweet smell into the air, like they do at most Disney parks, at the Arabian Coast, they pipe middle eastern spice smells (kind of curry-esque) into the air. It’s really cool!
- Big poofy headpieces. So you know how we wear mickey ear headbands here in the US? In Japan, huge character stuffy-heads are popular. I’m not explaining this well, but basically it’s a cross between a hat and a legit mascot’s head. They make the wearer look a bit like a bobble head. You’ll think you’re seeing a real character, and then suddenly realize it’s just a regular old park-goer wearing a huge massive character headpiece. It’s pretty unique!
- Lots of characters out and about. Prior to going to the Tokyo parks, I had spent one day at Disney Hong Kong, and many many days at the California Disney Parks. I saw 2x the number of characters up close in the two days I spent at the Tokyo park than I’ve seen in all my other park days combined. Now, I had never been to a Disney park with a kid before, so there is a possibility that I would have seen a lot more characters at the other parks if I had been in the kiddie areas. BUT I actually suspect that character sightings are more thrilling to the Japanese audience than to other audiences, so perhaps they provide more of them! Generally for the drive-by sitings (when the characters are just out and about) in Japan, they will not let adults get very close to them, but most of the time the characters will seek out kids to take pictures with, so L got a lot of pictures with the characters. We did quickly learn that if they characters were just out and about they would NOT sign her autograph book…we had to wait in line to get autographs!
Most importantly: if you’re an adventurous family, going to the Tokyo parks is a great compromise: The kid gets a kid day, and you get to travel and explore another culture for the rest of the week! Everybody wins!
-
How to Travel: A Beginner’s Guide

I’ve had several friends approach me and tell me that they really really want to travel, but they have no clue how. As far as I can understand, they’re simply overwhelmed with choices and unknowns and don’t know where to start. This is for them. Here’s my newbie guide for planning an international trip:
Step One: Pick a Destination. Seriously. Any destination will do. I think some people might get caught up thinking that there’s a way to pick the wrong destination. There’s really not. Every place is cool to visit and every season is interesting to experience. Here are a few things to consider when looking at a destination:
Safety. Some places are safer to visit than others. I’ve visited plenty of places that are considered less-safe, but I’ve never visited a place that I regretted visiting. I do avoid countries that are in the middle of war, but other than that, I do sometimes visit places that it’s not recommended Americans visit. The US State Department puts out travel advisories, so if you’re questioning the safety of a place you’re considering visiting, you can look to see if the US government has any recommendations/warnings related to the destination you’re considering. I’d say if you’re new to travel and are worried about safety, starting out with a country that has no warnings from the State Department is a good way to go.
Price. Some places are more expensive to visit than others, and it is important to factor in what destinations will fit your budget, considering exchange rate, airfare, lodging, food, transportation, safety, and activities. To figure this out, the internet is your friend. You can research hotel prices, or google, “cheap places to travel,” and look up exchange rates online to get a better idea of cost.
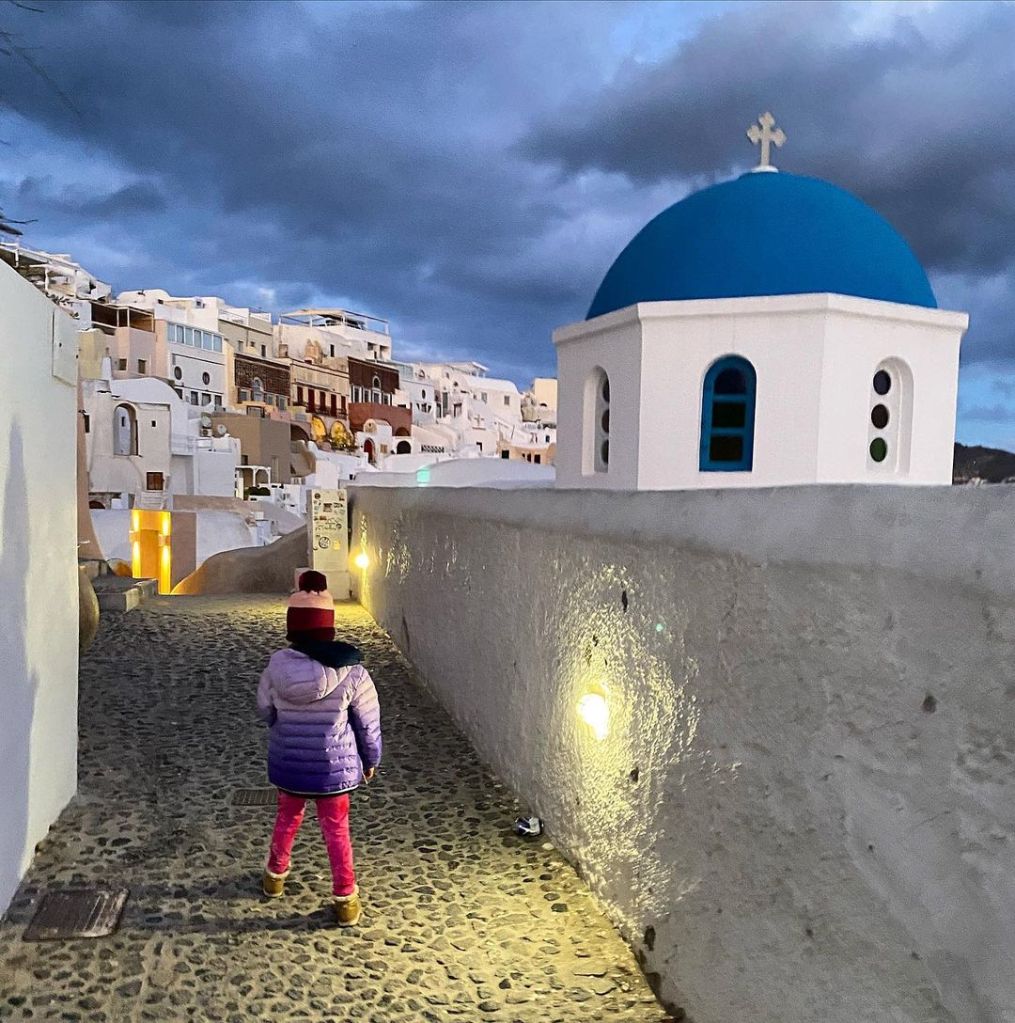
Season. For any destination, there are better times to visit weather-wise, but visiting in the off-season can be really cool for it’s own reasons. For example, in 2021, we went to Greece for Christmas. One of the most famous areas in Greece is Oia in Santorini. Oia is the picturesque island town with the blue and white homes on the cliffs; quintessential Greek Island. It’s got adorable cobblestone streets. During the summer, those streets are covered with tourists, and it’s hard to get food at a restaurant without reservations made weeks in advance. In the winter, the streets were quiet. The downside to this was that most restaurants and many shops were closed. We ate at least one meal a day at Vitrin, a crepe and sandwich spot because it was the only restaurant that was reliably open. Oia has a famous bookshop that we didn’t get to see because it was closed the whole time we were there. The upside to being there in the off-season was that we got to experience the town crowd-free. We went to the beach and swam completely by ourselves. We got great sunset views at the castle without needing to get there hours early. I got lots of cool pictures with no tourists in them. All of this is just to say: It’s okay to try a place in the off-season. All places are worth visiting during all seasons. Our family prefers to travel during shoulder seasons because typically the prices for hotels are lower and the crowds are less, but we can still get lots of good weather days.
Conclusion: The main thing I want you to take from this is to consider the factors I mentioned above, and then pick a destination knowing that there is no wrong decision. You can have a fabulous time in any destination, I promise!
Step 2: Research Your Destination The next step is to research your destination to give yourself a good idea of what you might like to see and do while you’re on vacation, and to plan ahead for any entry requirements. This is important to do before you leave so that you are sure you’re allowed to enter the country, know where you may want to stay, know whether or not you need to rent a car, and know which airport(s) you may want to fly in or out of.
Figure out Entry Requirements. You’ll want to know if your destination has any health-related entry requirements, and any visa requirements. How to do this? Google, of course! During COVID, I’d typically just search, “COVID restrictions for US citizens entering __________,” which would give me all the information about tests that we’d need to take or documentation we’d need to complete in order to travel where we wanted. For recommended vaccinations, I typically search “CDC travel ____________” and that brings me to the CDC’s website and tells me what vaccinations/treatments I might need to consider when traveling to the country in question.
Finally, to figure out visas, I search “US citizens visa requirements __________.” From there, I scroll down to the US State Department website to make sure I have the official information about visas for the country I want to visit. I have failed to do this in the past, and then had to frantically complete my visa application online while at the airport, as the airline would not let us board the plan until we had proof of visa. Don’t make that mistake!
Find out What Interests You at Your Destination. How to do this? There are many ways! Some people check out travel books from the library and read them. Some watch YouTube videos. I do a little of both of these, but mostly I use Google. I search “Cool things to see in ______” and “cool things to do in ________.” If I see something interesting in my search, I document it in a Word document. Once my interest list is complete, I get on Google Maps to get an idea of where the things I’m interested in are located. If a lot of the things I want to see are in one area, I’ll put that area on my list of “go-to” spots in the county I’m visiting. I’ll also re-arrange my Word doc according to region so that I’ll have an idea of how many activities I’m interested in in each region.
Step 3: Book Your Flights. If you find a really great deal on a flight, go ahead and book it right away. That gives you 24 hours to complete steps 1 and 2, and you can cancel/modify your flight if you realize that you’d rather fly in/out of different airports, or if you need more time because there are so many interesting things to do at your intended destination. More often though I will complete steps 1 & two and THEN book the flight, because if I complete steps 1 & 2, I’ll have a better idea of where I want to fly in/out of, and how long I’ll want in the country I’m visiting.
Step 4: Pick Your Lodging. Once I have my list of places I want to visit, then I can make decisions about which city/cities/towns I want to stay in during my visit. If I have a lot of things I want to see in one city, I’ll stay there for a longer period of time. If I’m visiting a large city, I’ll often simply Google “best neighborhoods to stay when visiting ________.” Usually from there I’ll come up with 2-3 good options and then I’ll book hotels/AirBnBs in the more affordable of the recommended neighborhoods.
I do tend to take a long time picking lodging. I look at prices. I look at reviews. I search on various booking sites. The result is that we often stay in really cool places for relatively low prices. Buuuut, it does take a long time!
A note here: I have not always booked lodging before leaving the US. Experimenting with doing both (booking ahead vs not) I’ve found that if I don’t book lodging ahead of time, I basically end up with two choices: 1) spending time that I could be spending exploring a cool place searching for a hotel, or 2) paying a LOT of money for hotels. Often, it’s actually a combination of both of these things! Thus, I now land solidly in the book-lodging-ahead-of-time category.
Step 5: Book Things that Must Be Booked Ahead of Time. Remember that interest list that I created in step 2? I’m a pretty big fan of using that list for ideas of what to do while I’m traveling. But sometimes there are things that must be booked weeks/months in advance, (for example: things that might sell out) so for those things I do book them while I’m at home. Examples of things that need to be booked ahead of time? Visiting the crown at the Statue of Liberty (must be booked months in advance), Tokyo Disney (they sometimes sell out), Afternoon Tea (I loooooooove going to afternoon tea, but you usually need to book it 2 days in advance. Therefore, I just book it while I’m at home to make sure it’s all taken care of). There are people who like to plan every second of their vacation. I don’t. I have a list of things that interest me, have lodging in place, and then only book the things that I might miss out on if I don’t book in advance.
It’s also at this time that I would book a rental car if we decide that we need one for our trip, and complete any visa paperwork that is needed.
Step 6: GO! Yep, that’s it. After you’ve done steps 1-5 you’re all ready to go! HAVE FUN!
I hope this is somewhat helpful to my wannabe traveler friends!
-
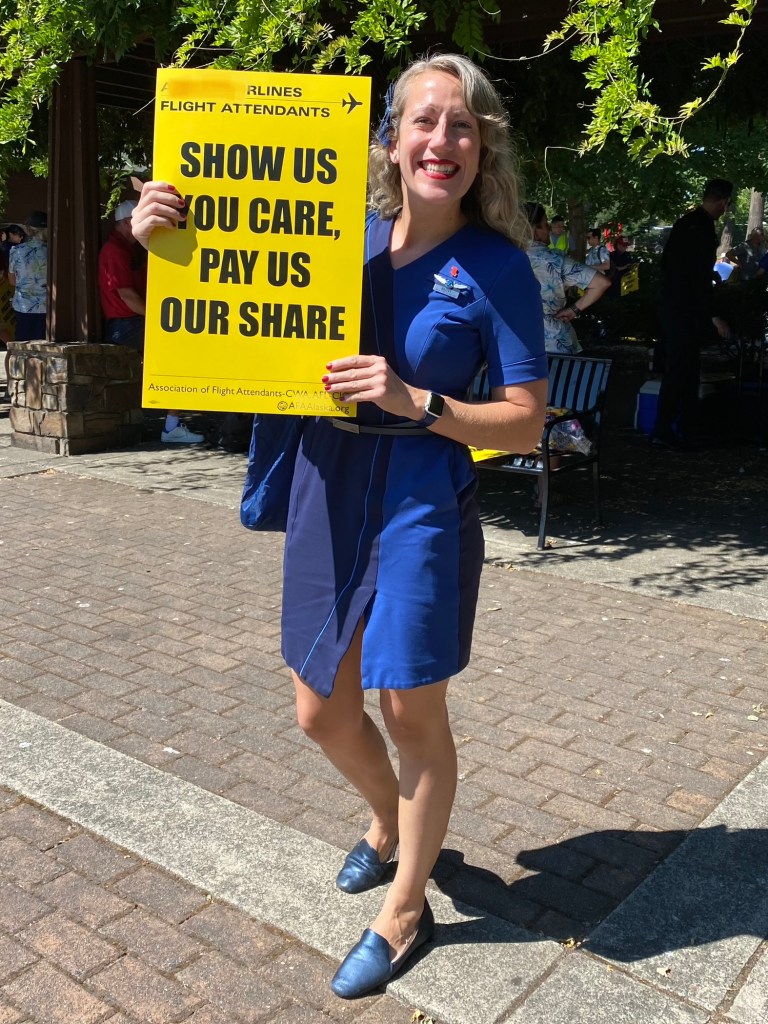
Let’s Talk about Christmas…and Fair Pay

I know it’s August and all, but today is picketing day for my union, so I think it’s a good day to discuss what happened for me on Christmas to demonstrate the unfair labor practices of the airline industry in the US.
I don’t know if you all remember, but basically the Pacific Northwest completely melted down on Christmas Eve 2022. It doesn’t snow or freeze all that often here in the PNW, so as a result we don’t have the plows and other equipment that I’m accustomed to in the midwest. The PNW always falls apart when there’s snow. The airline industry also falls apart. We don’t have enough plows, de-icers, or salt trucks to address snow and ice. Further, even if we did, some winter conditions simply are not safe to fly in.
Here’s what happened to me at Christmas time:
My company pays us 2x our normal pay rate for flying on Christmas Eve and Christmas. I volunteered to work these days because I have so much guilt about the piddly little money I bring into the household now that I’m a flight attendant. About a week before Christmas, Saign told me he thought I was very silly. He pointed out how low my pay is anyway. He said, “So if you get paid double on Christmas, you’ll make, like, $100 extra, right?” I thought about it for a moment, “Yes…” I said. “Is $100 worth missing Christmas?”
OH MY GOODNESS. I realized he was right. I was missing Christmas with my young daughter for $100. That WAS ridiculous. I decided that I had made a terrible mistake. At that point though, there was nothing to be done, I was going to have to work on Christmas, it was already on my schedule.
On December 23rd, I was able to self-assign a trip for Christmas Eve and Christmas. I was going to spend Christmas Eve and Christmas Day in Puerto Vallarta! Suddenly it felt like maybe I hadn’t made a terrible mistake. Maybe it would all be okay…
On Christmas Eve morning, I made my way to the airport. My first leg of the day was a 1 hour flight to Portland. From there I would fly to PVR.
I successfully made it to Portland, where ice was delaying flights, including the flight that I was supposed to work to Mexico. It turned into what is called a “rolling delay,” with the flight being pushed further and further back. Around 1 hour before the newest flight time, I made my way to the gates and met my crew (at that point, I had sat at the Portland airport for over 4 hours as the flight was continually delayed). While we were standing there, I looked at my company phone and saw that the flight to PVR was cancelled. My crew and I walked away and called Crew Scheduling to ask what we should do next. We reached a message stating that we would need to leave our number for a call back.
We then had to wait.
Not being able to contact Crew Scheduling put us into a holding pattern: According to our contract, we must remain at the airport until we are released by Crew Scheduling, but…we couldn’t reach Crew Scheduling to be released.
Many of the crew around me were upset because while they were “pay protected,” meaning they would get paid for the hours of flying they were missing, but holiday pay is NOT pay protected so they would not get the double pay they had been counting on.
Meanwhile, as a reserve flight attendant, I was NOT pay protected. During the hours I spent at the airport, I reviewed our contract and I couldn’t figure out if I would even be paid anything. According to our contract, I am supposed to be given a hotel room if I have more than 4 hours between flights, but since Crew Scheduling was non-contactable, I was not given a hotel room. The automated system assumed I had been given a hotel room, so listed me as being off-duty, despite the fact that I was still on-duty. Because I was essentially abandoned at the airport, I wasn’t sure if I would be paid at all for the time I spent waiting to be released by Crew Scheduling.
About an hour after our flight was cancelled, both my company AND the Portland Airport put out statements on their websites saying that there would be no more flights leaving Portland that day. While I still couldn’t speak to Crew Scheduling, other flight attendants in my company were ahead of me in the phone queue and did speak to Crew Scheduling. They were told they had to remain at the airport, “In case we need to put you on another flight.” When these flight attendants pointed out that no flights would be leaving PDX per both the airport and our company, they were told that this was inaccurate and they would have to remain at the airport.
So there we sat, trapped. If we left, we’d risk getting fired for leaving. I had no place to go anyway, because Crew Scheduling hadn’t given me a hotel.
In total, I sat at the airport for 10 hours. After 10 hours, Crew Scheduling finally called one of my crew members who made sure they arranged a hotel for all of us.
At 11:00pm that night, Crew Scheduling called me and asked me if I needed anything, since I had put my number in for a call back. I explained that I needed to be marked as “on-duty” for the entire time I was stuck at the airport since I wasn’t offered a hotel.
I spent a long time that evening contacting my union reviewing the problem with contacting Crew Scheduling and requesting compensation. In the end? I got paid half-pay for the 10 hours I was trapped at the airport. To clarify, half-pay is below Oregon’s (and Washington’s) minimum wage. I spent Christmas Eve away from my family getting paid below the legal minimum wage.
So…how do airlines get away with paying its employees so poorly? An archaic law called the Railway Act allows airlines and railway companies to mistreat their employees. In this case, I was paid below minimum wage for the time I was trapped. On a normal work day, I spend plenty of time “on duty” while getting paid nothing.
And that, my friends, is why I spent today picketing in the heat with thousands of my colleagues to bring attention to the poor work conditions and pay that we tolerate as our company and shareholders make insane profits. Please support your flight attendants, many of whom are in a stalemate with their companies as we attempt to just get treated like normal American employees.
Also: I do not plan to volunteer as tribute for Christmas 2023. Lesson learned.
-
TooGoodToGo: The cheap food app perfect for travelers!

Things I love:
- Good deals.
- Surprises.
- Food.
As a result of these three loves, I am OBSESSED with the app TooGoodToGo. I promise, this is not a paid endorsement. It’s just one of my favorite things to use on a layover.
Basically, it’s an app where you can pay to get leftover food from restaurants, coffee shops, and grocery stores.
It’s amazing for a traveler who wants to try local cuisine but also wants to save money. (ME! It’s MEEEE!)
Basically the app will search by location and tell you what restaurants have “surprise bags” available in the next day or so. Often it will give you some clue of what to expect (such as “bread and pastries,” and you can filter the results to show you only meals, only bread and pastries, or only groceries.
It’s so fun!
Typically you’ll pay about 33% of the regular price for the food you get.
Users can rate their experience, so as a result it’s pretty easy to make sure you have a great experience. I personally try to stick with surprise bags with a rating of 4.5+. I typically get huge amounts of food (typically if it’s a “meal” bag it’s enough for two meals) for $5-6, and it’s good food!
TooGoodToGo is best to use in larger liberal “foodie” cities. (New York, San Francisco, etc). In smaller and more conservative areas you won’t find as many businesses that use ToGoodToGo.
The app is fantastic for flight attendants, with one HUGE caveat: The app uses the time zone that you are in while you’re using it! Twice now I’ve forgotten this, ordered food for the next day while on the west coast, and then been surprised when I got to the east coast and my food wasn’t ready when I thought it would be.
TooGoodToGo is best for people who eat a wide variety of foods and who don’t have dietary restrictions. You can filter for vegetarian options, but I don’t believe there is much for people with allergies or other food sensitivities.
I like to take my TooGoodToGo meals and enjoy them in a nice little local park.
Here’s some examples of recent TooGoodToGo scores:
In Chicago, I got a small pizza, medium Greek salad, and medium fruit salad all for $5. The best part? The park I ate it in had a Chicago Dog kiosk nearby and I noticed that I could have spent $6.50 for ONE hotdog, but I spent less and got a huge amount, good quality, and good variety of food!

In Hoboken, I got two huge Indian meals with rice, lentils/chickpeas, and chicken/beef. In this case, the cashier messed up and accidentally prepared me two boxes when I ordered one, but I sure was happy to get all that for $5!
In New York and New Jersey you can typically get a dozen bagels for $4, and sometimes they’ll even come with a little topping (usually not cream cheese, since it has a good shelf life! Think more like spicy tuna!).

So go…start using the TooGoodToGo app and enjoying fabulous local food at a discounted price!
-
My AirBnB Nightmare

I generally think that AirBnB is great. At some point, I’ll write about why I love AirBnB, but today I’m going to write about my AirBnB nightmare. Here’s how it went down:
I booked an AirBnB near Kuromon Market in Osaka for 3 nights. I was supposed to land at around 10pm at the Osaka Airport, and then the plan was to take the train into the city and walk to the AirBnB. Saign and L were on a different flight, and would not arrive until the next morning.
The problem? Well, there were many.
I noticed before I left the US that the AirBnB host had given me an address and a door code, but hadn’t specified where to look for the door code/lockbox, or specified an apartment number. Since I was landing late at night, I wanted to have this straightened out before I landed. The night before I left for Japan, I sent the host a message asking about the apartment number and where to look for the lockbox. He replied, “Just a moment…” and…nothing else…
I had to wake early for my flight the next morning, so didn’t have time to worry about how to find and access the AirBnB. I hoped that the lockbox was obvious, and hoped that maybe there was only one apartment above the restaurant he had instructed me to go to.
My flying itinerary involved a way-too-short layover in Tokyo. My plane landed late, then taxied for forever, then I had to go through a long customs line, and then take a bus to a different terminal to get on my plane to Osaka.
I missed my flight to Osaka, and would have missed the last flight of the night, except the ticketing agent literally ran with me across the airport to a special super-fast security area.
I made it to Osaka, but it was late at night. I was very aware that I needed to get things done fast, because I knew the trains in Japan don’t run very late, and I was at risk of missing the last train into Osaka. I got a Japanese Sim Card and then successfully navigated buying a train ticket. I went down to the train terminal, and while I was down there, I realized that my sim card wasn’t working. If I hadn’t been at risk of missing the last train into the city, I would have gone back up to the airport terminal to access wifi and figure out how to get my sim card working, but, I couldn’t risk missing the train.
I took the train into Osaka and successfully walked to my AirBnB. The host had previously told me the apartment was above a restaurant, so I was fairly certain I was in the right place, though I couldn’t find a numbered address anywhere. The front door to the apartment complex was open, so I was able to get in, but there were several floors of apartments, so I had no idea where to go (since the host had not provided me with an apartment number). It was midnight, and I was alone, and I had no way to get in touch with the host because my sim card wasn’t working.
I should also mention that my phone was running low on battery. I’m generally very careful about saving battery life when traveling, but I had a long layover in Vancouver, so I used it when out exploring on my layover. The terminal I was in at the Vancouver Airport didn’t seem to have any outlets that worked, and then the plane I flew on did not have any outlets. So…I was nervous about running out of battery in addition to being worried about how to access the internet.
I walked around a bit, trying to find some wifi that was not password protected (but this was a drain on my battery…). I was able to get on wifi and send my host a message explaining that I was locked out and alone and desperate…and then that wifi stopped working.
So I was alone, walking around in a strange city in the dark with all my luggage with me, with no way to contact my AirBnB host.
I cried a little bit.
I went back to the apartment building and found that someone had locked the exterior door that had previously been unlocked, so I was now completely on the streets by myself.
I cried a bit more. I didn’t know what to do!
Suddenly I remembered something: My work phone! I had brought my work phone with me, and since it’s a T-Mobile device, it should work in Japan! We’re discouraged for using it excessively for non-work related purposes, but desperate times…
I turned on my work phone, and found that it worked just fine! I was able to log into AirBnB to find that the host had not responded to my plea for help. I was able to find the AirBnB customer service number. I spoke to an agent at AirBnB who said she’d call the host.
She called. He didn’t answer.
At this point, I pushed for a solution. I pointed out that I was a woman alone in the dark in an unfamiliar city. I pointed out that I had already tried to get ahold of the AirBnB host 2x (once before I left the states, and then 30-or-so-minutes before speaking to the agent). I explained that I was exhausted and needed a solution now. She stated that I could get a hotel and that AirBnB would reimburse me. I asked if she would reimburse me the cost of transportation to the hotel, as the trains were no longer running, so I’d have to take an Uber/taxi, and she stated that only the cost of the room would be reimbursed.
I hung up with her, and looked for a nearby hotel on Google Maps. I found several. The problem? It was now 1am-or-so, so I couldn’t book a hotel for that night! I needed a hotel for 4/14-4/15, but because it was already 4/15, none of the booking sites would let me book for 4/14-15!
I didn’t know what to do. In the end, I decided to walk to the nearest hotel. It was only about a block away, and I found it easily. When I got there, the door was locked, but there was a manager on duty. I waved at the manager and he let me in.
He did not speak English.
I do not speak Japanese.
Using a translator app, I asked him if had a room available.
He stated that he did not.
I was very sad.
But wait! While I was speaking to him, I noticed a display with the hotel’s wifi code! Very useful!
I sat on a bench outside the hotel and logged into the hotel’s wifi. I planned to try to find another hotel.
While I was logging onto the internet, the hotel manager came out and motioned me back in.
I followed him in.
Using his translator app, he explained that he could give me a room for just one night.
I took it!
It was a tiny box of a room, but it had a bed and a shower!
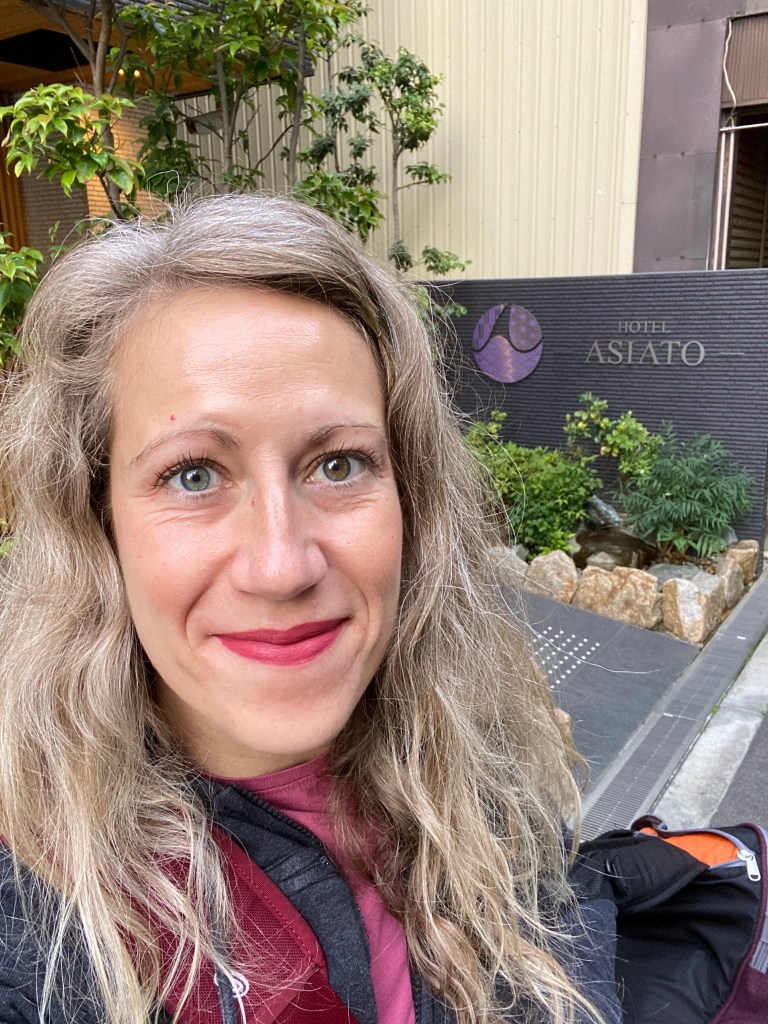
Thank you, Hotel Asiato, for giving me a bed when I was desperate… After my shower, I got a message from the AirBnB host providing me with the apartment number and another door code. I told him that I’d try to access the apartment the next morning, but that I was safely checked into the hotel.
I didn’t sleep much that night, because I was quite adrenaline-filled.
The next morning, I tried again to re-access the AirBnB apartment. It turns out the host had initially given me only the code for the front exterior door. Oh. And the keypad for the exterior door only lights up to show the numbers if you push one particular button; so while I had touched it the night before in my desperation to get in, it never lit up to reveal the numbers.
I looked through my messages, and the host had provided the apartment number with the address at some point…though (he didn’t realize this), the address didn’t translate to English the way he thought it would, so when I looked at it, the address was a series of numbers and then Japanese characters and then numbers and then Japanese characters, etc, such that I could not tell which was the apartment number.
Finally…he had forgotten to give me the door code for the individual apartment that I was staying in! Even if I had figured out which of the numbers was the apartment number, I wouldn’t have gotten in, because I hadn’t received the door code!
Anyway, I did eventually get into the AirBnB. AirBnB did NOT reimburse me for the entire hotel cost, but they reimbursed some of it.
I know some people are scared of AirBnBs and will read this and conclude that one should never stay in an AirBnB. I strongly disagree, and even when I was locked out in the dark, crying, and speaking to the AirBnB agent, I knew that I would definitely 100% use AirBnB again. The host was human. He made an error. The error was worsened by my late arrival and communication challenges. But, I have stayed at many unique and beautiful and also affordable properties with AirBnB, and I will 100% use them again.
I *may* be more careful about making sure check-in instructions and apartment location are clear next time around though!
-
Subscribe
Subscribed
Already have a WordPress.com account? Log in now.
